This article shows how to replace the CV Joint Boots on a 2006 VW Passat 2.0 T. It is a good practice to examine the CV Joint Boots on a yearly basis or when rotating the tires. It is a lot cheaper to replace the boot in time instead of the actual CV Joint.
Original 2006 VW Passat Outboard CV Joint Boot Kit

STEP 1: Loosen the five lug nuts that fasten the rim and remove the center VW cap. Then remove the center bolt and jack up the car to remove the tire.

M14 Center Bolt


This is the left outboard CV Joint Boot. The boot is actually torn to left side of the smaller CV Joint Boot band (clamp) groove (removed in this image) from the top.

STEP 2: Remove the bolt that fastens the Outer Tie Rod End.

These are the three bolts that fasten the outboard CV Joint.

STEP 3: Unscrew the bolts of the outboard CV Joint Seat.

STEP 4: Lift the outboard CV Joint off its seat. You can use a pry bar carefully to do so if it is difficult to move.


This is where the center bolt fastens to the output shaft of the CV Joint in the hub. You may need to spray some WD-40 into it inorder to be able to pull out the output shaft of the CV Joint from the hub because it may be a little rusted.


I clipped off the outboard CV Joint Boot Band (clamp) in this image for viewing purposes. It is preferable that you don't remove the large band (clamp) until you have removed the whole shaft with both outboard and inboard CV Joints.

Inboard CV Joint

STEP 5: Some cars have the inboard CV Joint fastened by 6 Hex bolts, but on the 2006 VW Passat 2.0T, there are no bolts. Remove the inboard CV Joint carefully with the help of a pry bar.

Whole CV Shaft with outboard and inboard CV Joints.

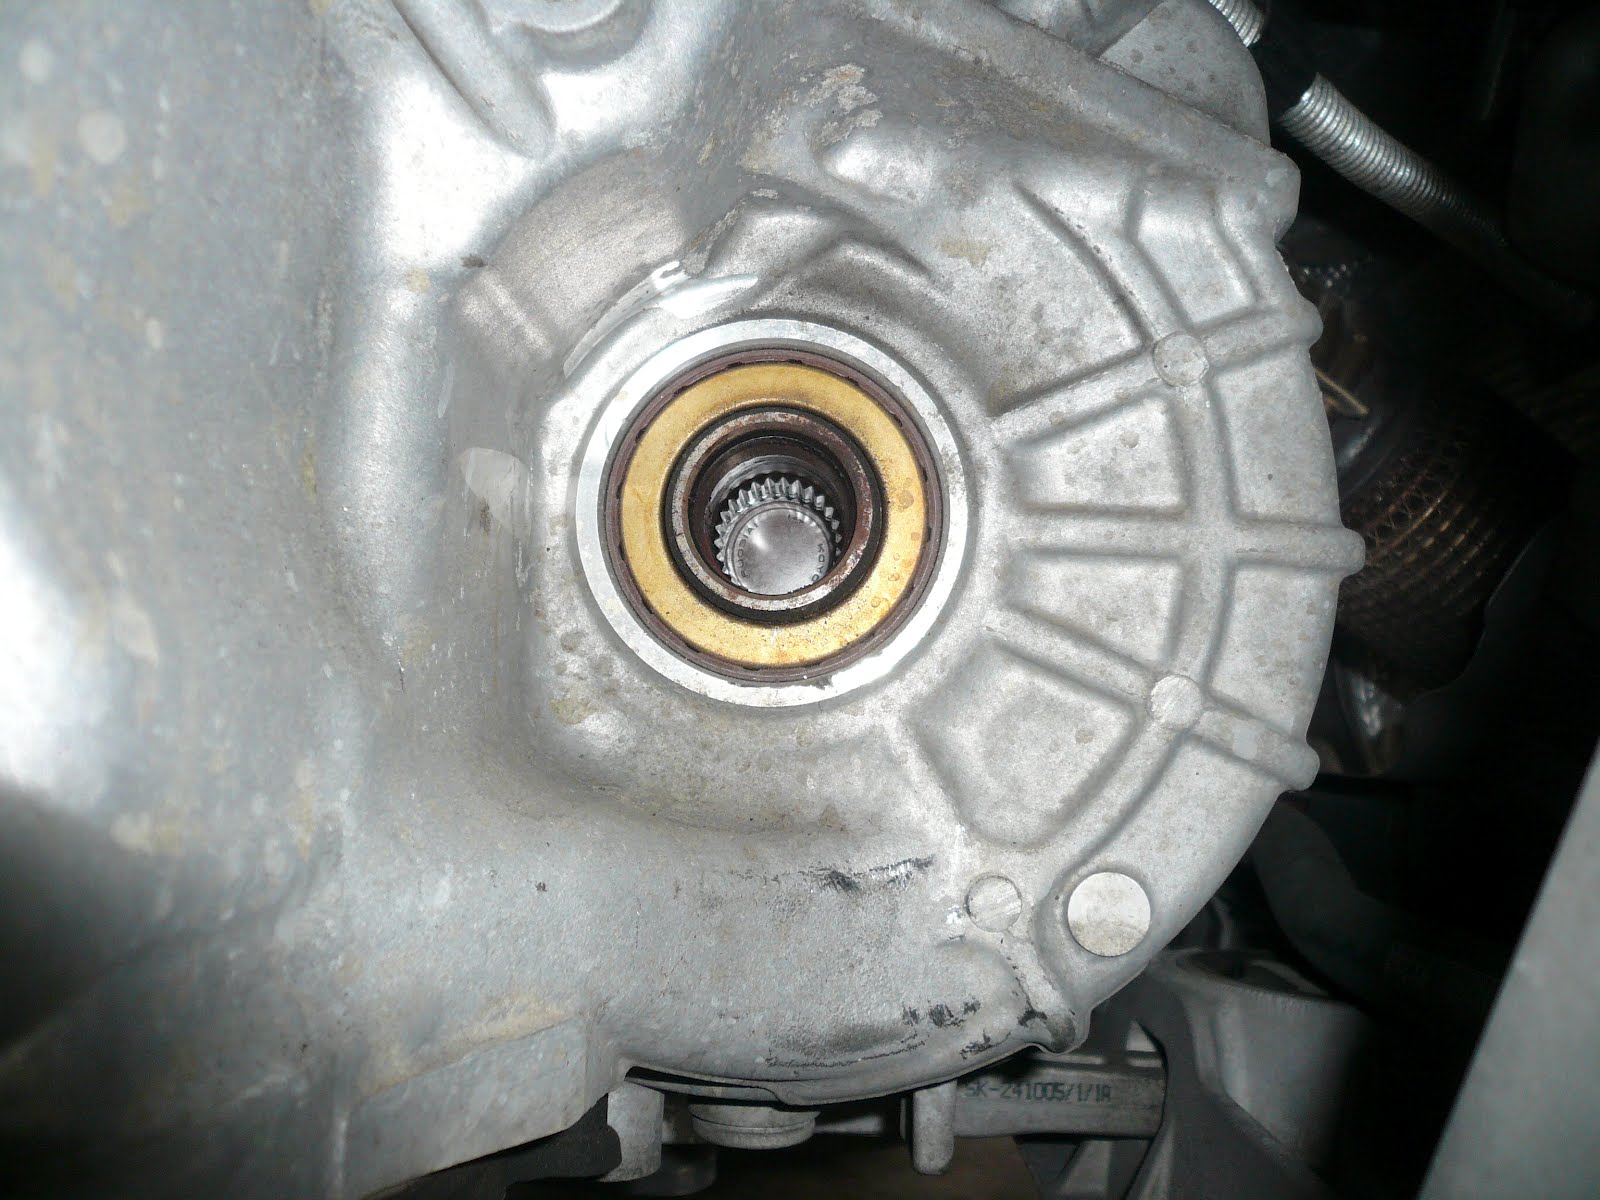
This is where the inboard CV Joint Output Shaft connects to the gear box.

Fasten the center of the CV Shaft between two pieces of wood, to avoid damaging the CV Shaft.

Before we go any further, I would like to point out something that can save you some time. In my case, only the outboard CV Joint Boot was a little torn, but when I removed the whole CV Joint Shaft and examined the inboard CV Joint Boot, the rubber was worn out as well eventhough it wasn't torn. Therefore I recommend that you change both CV Joint Boots at the same time. Also, if the CV Joint Boot isn't completely torn and no debris has damaged the CV Joint, you can replace both boots by only removing the inboard CV Joint and sliding the outboard CV Joint Boot down the shaft from the inboard CV Joint side as I did in this case without taking apart the outboard CV Joint.
STEP 6: Now, remove the inboard CV Joint large band (clamp) and slide out the metal housing above a drip pan to capture the grease that may drip from the boot.

STEP 7: Remove the round Snap Ring at the outer edge of the shaft and slide off the Spider & Rollers assembly from the shaft (mark the Spider & Roller assembly with a marker to ensure proper reassembly on the CV Shaft). Then remove the inboard CV Joint Boot and the outboard CV Joint Boot as well by sliding it down the CV Shaft. Clean all the parts from the grease or debris if any with a parts cleaner solvent and blow dry them with an airgun.


STEP 8: Place the CV Shaft in a vertical position with the outboard CV Joint in the lower position. Then empty the tube of grease as shown onto the CV Joint making sure you lubricate the crevices and avoid getting grease outside the rim to ensure clean assembly. Pay attention to the grease tubes if you are replacing both boots, because the outboard CV Joint grease is thicker in consistency and color than the inboard CV Joint grease. So don't mix up the tubes!!!


STEP 9: Slide down the outboard CV Joint Boot with the large band (clamp) until it slips into the designated groove on the metal housing. Now make sure that it is in the right position and then tighten the band (clamp) with the CV Boot Clamp Pliers.

STEP 10: Slide the smaller end of the outboard CV Joint Boot into its designated groove on the CV Shaft. Then slide the smaller band (clamp) into position, make sure everything is correctly positioned and then tighten the band (clamp) with the CV Boot Clamp Pliers.

STEP 11: Now, slide the small band (clamp) down the CV Shaft followed by the inboard CV Joint Boot.


STEP 12: Reassemble the Spider & Rollers onto the CV Shaft.


STEP 13: Then put on the round Snap Ring to lock them into position.

STEP 14: Now, place the round Spring Clip on the outer end of the Output Shaft that extends from the metal housing of the inboard CV Joint. This way you will not forget it.


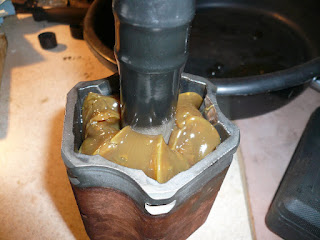
STEP 15: Place the inboard CV Joint Metal Housing vertically. Then empty the whole tube of grease that came with the inboard CV Joint Boot Kit into the metal housing of the inboard CV Joint. You can see in the following image that the color and consistency of the grease for the inboard CV Joint differs from the outboard CV Joint.

STEP 16: Make sure that you have already slid the small band (clamp) and inboard CV Joint Boot onto the CV Shaft as mentioned in STEP 11!!! If you have done so, now place the inboard CV Joint into the greased metal housing slowly until it reaches the bottom of the metal housing
STEP 17: Slide down the inboard CV Joint Boot until it fits into its designated groove on the metal housing of the inboard CV Joint.

STEP 18: Inspect the large end of the inboard CV Joint Boot to make sure it is in the groove correctly, then put the Large Boot Band (clamp) into position and carefully tighten it using the CV Boot Clamp Pliers.

STEP 19: Slide the smaller end of the inboard CV Joint Boot into its designated groove on the CV Shaft, then slide the Small Boot Band (clamp) into position. After inspecting that everything is properly positioned, carefully tighten the smaller boot band (clamp) with the CV Boot Clamp Pliers.

Completed CV Joint Boot Replacement.

STEP 20: Insert the output shaft of the inboard CV Joint into the designated gearbox hole carefully, until it is fully pushed in.

STEP 21: Now, insert the Output Shaft of the outboard CV Joint into its designated hole in the hub carefully, until it is pushed in completely.

STEP 22: Place the CV Joint & Hub assembly onto the CV Joint seat and fasten the the bolts.


STEP 23: After making sure that the Output Shaft of the outboard CV Joint is positioned properly in the hub, place the center bolt back into position and tighten it with a Torque Wrench according to VW specifications of your car. For the 2006 VW Passat M14 bolt, tighten to 85 ft-lbs/115 Nm, then turn an additional 180°.


STEP 24: Reattach the Outer Tie Rod End and tighten its attaching bolt.

STEP 25: Finally, place the tire back on the hub, tighten all the lug nuts, and install the center VW Cap over the center bolt.

Original 2006 VW Passat Outboard CV Joint Boot Kit
STEP 1: Loosen the five lug nuts that fasten the rim and remove the center VW cap. Then remove the center bolt and jack up the car to remove the tire.
M14 Center Bolt
This is the left outboard CV Joint Boot. The boot is actually torn to left side of the smaller CV Joint Boot band (clamp) groove (removed in this image) from the top.
STEP 2: Remove the bolt that fastens the Outer Tie Rod End.
These are the three bolts that fasten the outboard CV Joint.
STEP 3: Unscrew the bolts of the outboard CV Joint Seat.
STEP 4: Lift the outboard CV Joint off its seat. You can use a pry bar carefully to do so if it is difficult to move.
This is where the center bolt fastens to the output shaft of the CV Joint in the hub. You may need to spray some WD-40 into it inorder to be able to pull out the output shaft of the CV Joint from the hub because it may be a little rusted.
I clipped off the outboard CV Joint Boot Band (clamp) in this image for viewing purposes. It is preferable that you don't remove the large band (clamp) until you have removed the whole shaft with both outboard and inboard CV Joints.
Inboard CV Joint

STEP 5: Some cars have the inboard CV Joint fastened by 6 Hex bolts, but on the 2006 VW Passat 2.0T, there are no bolts. Remove the inboard CV Joint carefully with the help of a pry bar.

Whole CV Shaft with outboard and inboard CV Joints.

This is where the inboard CV Joint Output Shaft connects to the gear box.
Fasten the center of the CV Shaft between two pieces of wood, to avoid damaging the CV Shaft.

Before we go any further, I would like to point out something that can save you some time. In my case, only the outboard CV Joint Boot was a little torn, but when I removed the whole CV Joint Shaft and examined the inboard CV Joint Boot, the rubber was worn out as well eventhough it wasn't torn. Therefore I recommend that you change both CV Joint Boots at the same time. Also, if the CV Joint Boot isn't completely torn and no debris has damaged the CV Joint, you can replace both boots by only removing the inboard CV Joint and sliding the outboard CV Joint Boot down the shaft from the inboard CV Joint side as I did in this case without taking apart the outboard CV Joint.
STEP 6: Now, remove the inboard CV Joint large band (clamp) and slide out the metal housing above a drip pan to capture the grease that may drip from the boot.

STEP 7: Remove the round Snap Ring at the outer edge of the shaft and slide off the Spider & Rollers assembly from the shaft (mark the Spider & Roller assembly with a marker to ensure proper reassembly on the CV Shaft). Then remove the inboard CV Joint Boot and the outboard CV Joint Boot as well by sliding it down the CV Shaft. Clean all the parts from the grease or debris if any with a parts cleaner solvent and blow dry them with an airgun.


STEP 8: Place the CV Shaft in a vertical position with the outboard CV Joint in the lower position. Then empty the tube of grease as shown onto the CV Joint making sure you lubricate the crevices and avoid getting grease outside the rim to ensure clean assembly. Pay attention to the grease tubes if you are replacing both boots, because the outboard CV Joint grease is thicker in consistency and color than the inboard CV Joint grease. So don't mix up the tubes!!!


STEP 9: Slide down the outboard CV Joint Boot with the large band (clamp) until it slips into the designated groove on the metal housing. Now make sure that it is in the right position and then tighten the band (clamp) with the CV Boot Clamp Pliers.

STEP 10: Slide the smaller end of the outboard CV Joint Boot into its designated groove on the CV Shaft. Then slide the smaller band (clamp) into position, make sure everything is correctly positioned and then tighten the band (clamp) with the CV Boot Clamp Pliers.

STEP 11: Now, slide the small band (clamp) down the CV Shaft followed by the inboard CV Joint Boot.


STEP 12: Reassemble the Spider & Rollers onto the CV Shaft.


STEP 13: Then put on the round Snap Ring to lock them into position.

STEP 14: Now, place the round Spring Clip on the outer end of the Output Shaft that extends from the metal housing of the inboard CV Joint. This way you will not forget it.


STEP 15: Place the inboard CV Joint Metal Housing vertically. Then empty the whole tube of grease that came with the inboard CV Joint Boot Kit into the metal housing of the inboard CV Joint. You can see in the following image that the color and consistency of the grease for the inboard CV Joint differs from the outboard CV Joint.

STEP 16: Make sure that you have already slid the small band (clamp) and inboard CV Joint Boot onto the CV Shaft as mentioned in STEP 11!!! If you have done so, now place the inboard CV Joint into the greased metal housing slowly until it reaches the bottom of the metal housing

STEP 17: Slide down the inboard CV Joint Boot until it fits into its designated groove on the metal housing of the inboard CV Joint.

STEP 18: Inspect the large end of the inboard CV Joint Boot to make sure it is in the groove correctly, then put the Large Boot Band (clamp) into position and carefully tighten it using the CV Boot Clamp Pliers.

STEP 19: Slide the smaller end of the inboard CV Joint Boot into its designated groove on the CV Shaft, then slide the Small Boot Band (clamp) into position. After inspecting that everything is properly positioned, carefully tighten the smaller boot band (clamp) with the CV Boot Clamp Pliers.
Completed CV Joint Boot Replacement.

STEP 20: Insert the output shaft of the inboard CV Joint into the designated gearbox hole carefully, until it is fully pushed in.

STEP 21: Now, insert the Output Shaft of the outboard CV Joint into its designated hole in the hub carefully, until it is pushed in completely.

STEP 22: Place the CV Joint & Hub assembly onto the CV Joint seat and fasten the the bolts.


STEP 23: After making sure that the Output Shaft of the outboard CV Joint is positioned properly in the hub, place the center bolt back into position and tighten it with a Torque Wrench according to VW specifications of your car. For the 2006 VW Passat M14 bolt, tighten to 85 ft-lbs/115 Nm, then turn an additional 180°.


STEP 24: Reattach the Outer Tie Rod End and tighten its attaching bolt.

STEP 25: Finally, place the tire back on the hub, tighten all the lug nuts, and install the center VW Cap over the center bolt.
